Corona is real, the pandemic is ravaging the world. Social distancing is something we just have to do for a while and I hope we can flatten the curve. It sounds pretty simple: Just stay at home as much as you can (some countries are even in a total lockdown). But in real life it is not as easy as it sounds. It gets boring pretty quickly. No socialising, not going out for dinner, no coffee with friends. And for us climbers, not going to the crag or the gym.
On the one hand, if you think about the bigger picture, it feels unimportant to think about climbing and staying in shape. But on the other hand, it is important to keep busy and have some physical exercise while being in home quarantine. Humans, and especially climbers, are just not very good at sitting still all day. To be honest, I have never been a big fan of exercises and hangboarding myself. Not that I don’t believe it can bring a great benefit to climbing, I just generally don’t really like to do it. Usually, almost all of my own training is done on the climbing wall, and here comes the quarantine problem: I don’t have a home wall.
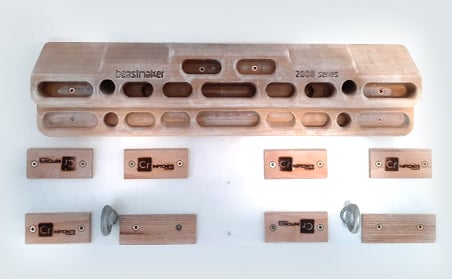
I do have a humble hanging setup with a wooden fingerboard, some micros and some pinch blocks. I made this one and a half years ago when I had a pulley rupture, so that I could have a good recovery at home. After this recovery I decided to keep up with hangboarding as an addition to my normal climbing routine. It was a bit off and on. I did some extra hangboarding but not really structured, it definitely is something I can improve on.
What I want to make clear is that I am not a hangboard pro, but I would like to share my hangboard routine and hopefully it helps a bit for those who are sitting at home and don’t know what to do with their hangboard.
Material needed
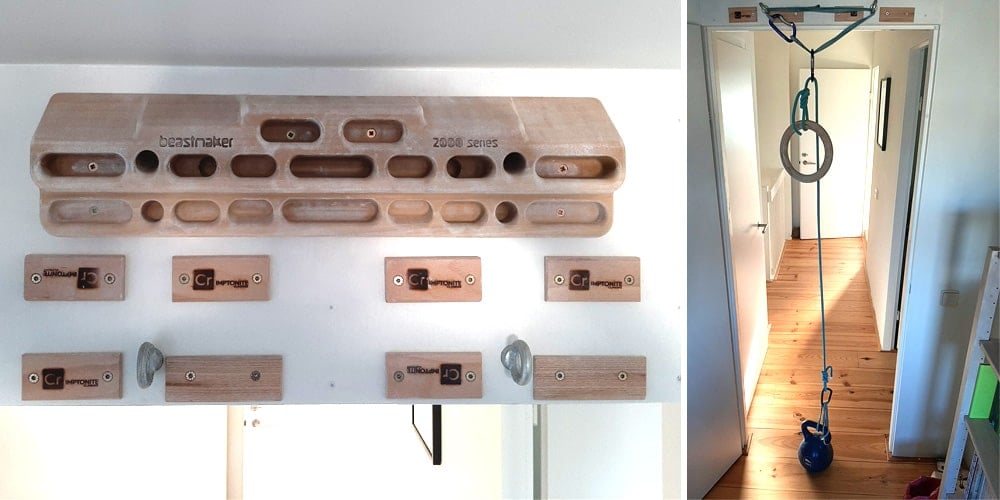
Obviously you need something to hang on. Most hangboards have a great variety of holds and pockets that I never use, a simple campus rung will also suffice in most cases. I also have some micro edges (5, 6, 8, 10 mm), I don’t use these that much because they are small and sharp and hurt my skin. And I have a set of wide and small pinch blocks that I like a lot. Last but not least I have a pulley system set up for one-armed hanging. For this, you also need some weights (I have some kettle bells and weight plates, but you can also be creative with things you have at home).
Grip types
Because there is always some ambiguity about the different grip types, and especially the different names people use for them, I thought it would be useful to explain what I mean when I say something like semi-crimp. Below I explain the finger positions that I use in my routine. There are more positions such as one and two finger pockets, but I don’t specifically train using those so have left them out. Keep in mind that finger positions differ a bit between different people because of the difference in finger length, some have really short pinkies or really long index fingers.
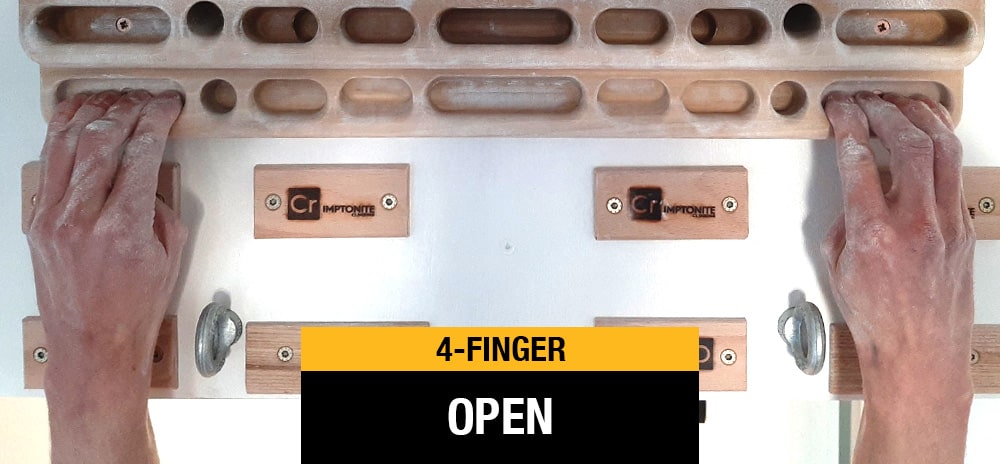
4 fingers open
With all fingers as open as you can be. This results in a stretched index finger.
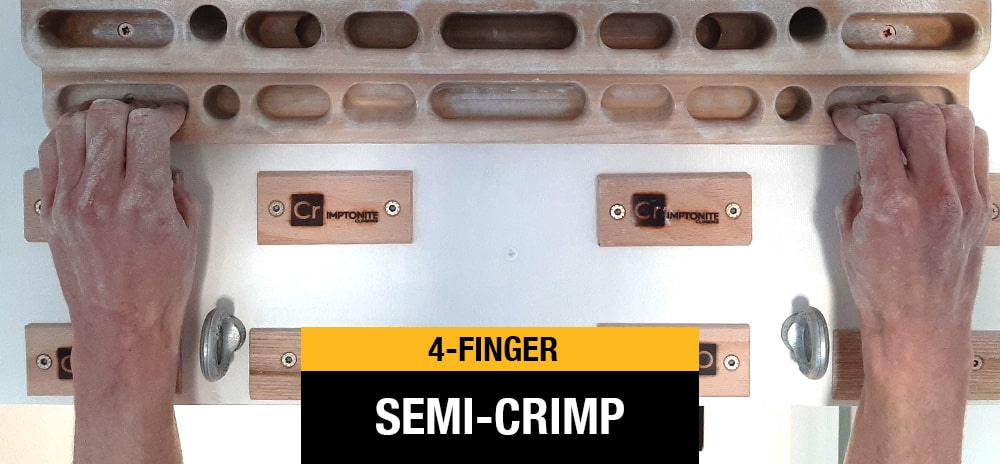
4 fingers semi-crimp
With all fingers in an ‘open crimp’ position (notice no use of the thumb). This results in your index finger being placed at a 90 degree angle. I don’t pay special attention to position of the pinkie.
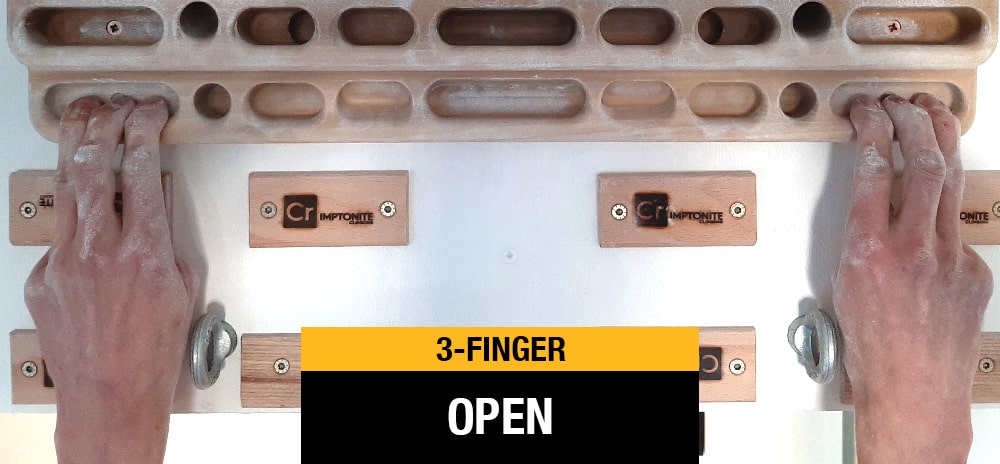
3 fingers open
Index, middle and ring. All as open as you can. The result is that all fingers will be (almost) fully stretched.
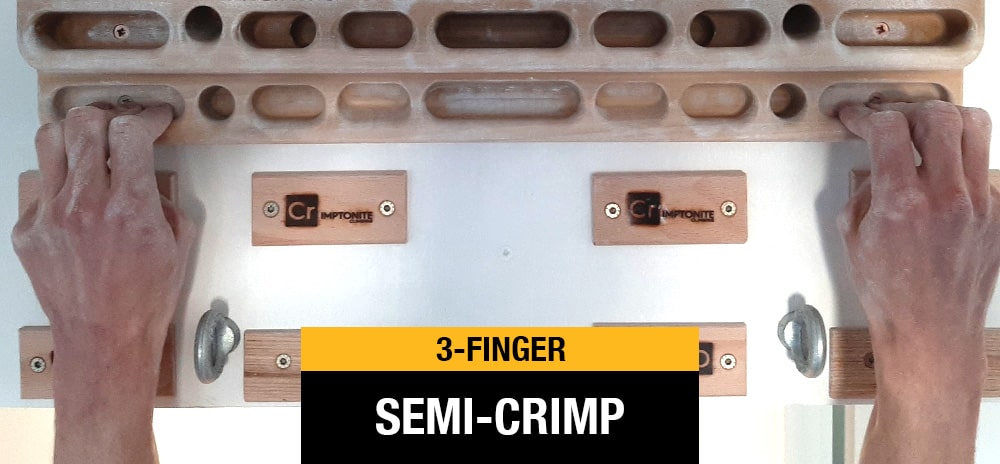
3 finger semi-crimp
Index, middle and ring. Same as 4 finger semi-crimp, only no pinkies.
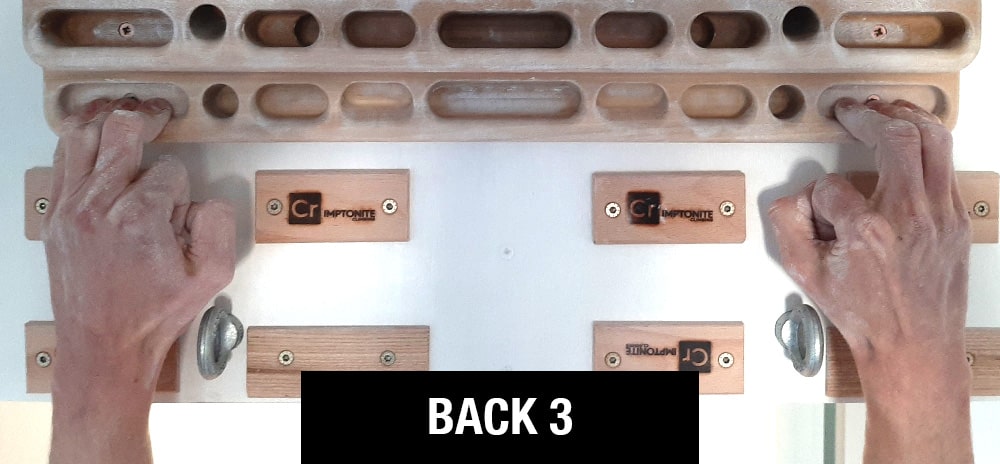
Back 3
Middle, ring and pinkie. This is a hard position as most are not used to doing this. I usually have a stretched pinkie and a semi-crimp middle and ring finger. The position differs greatly between people because of the length of the pinkie.
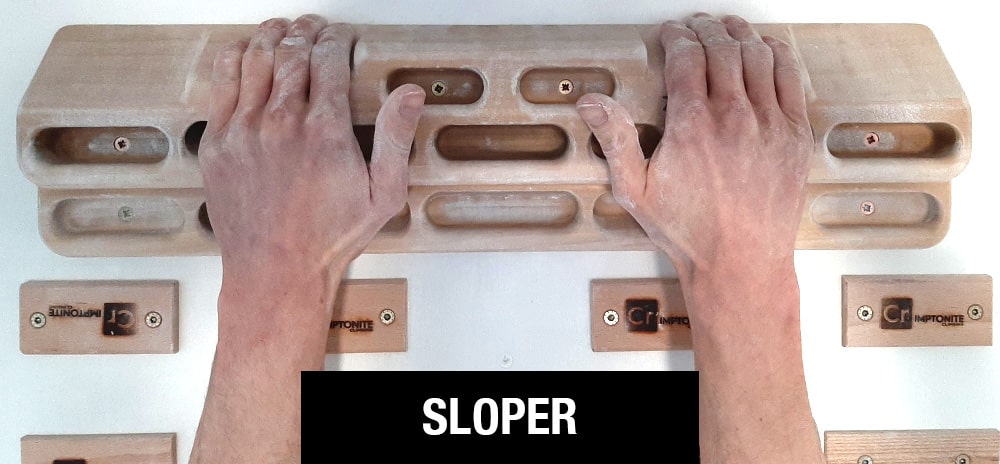
Sloper
All four fingers on a sloper hold, no use of the thumb. Make sure all fingers are as stretched as possible.
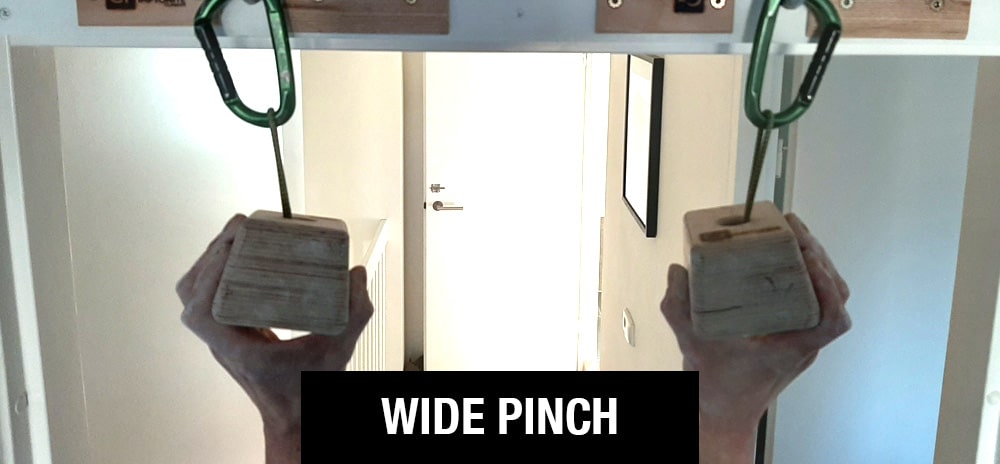
Wide pinch
On the big pinch blocks, all fingers and, of course, the thumb.
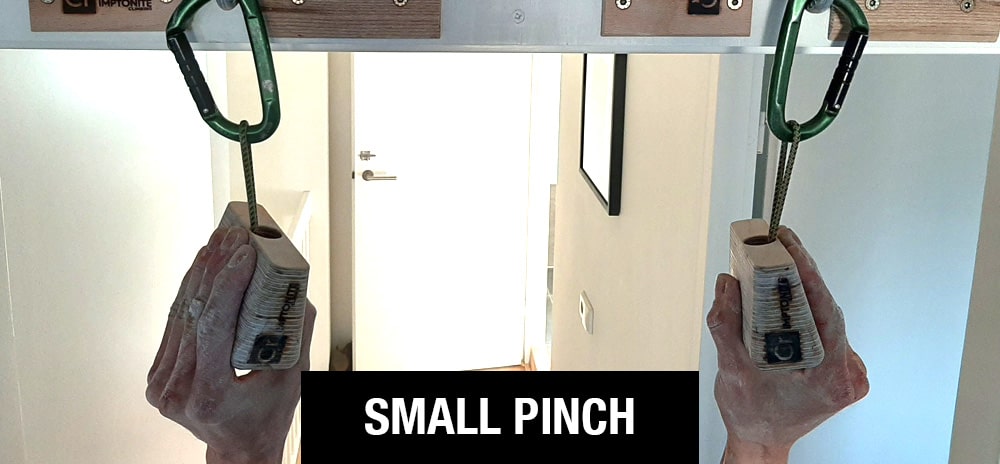
Small pinch
On the small pinch blocks, all fingers and, of course, the thumb.
Warm-up
Warming up at home can be a pain in the ass. I always start with some general resistance band exercises (I’ve been doing this when I go climbing for a few years now, and it’s helped me a lot with the pain I used to have in my elbows). After the resistance band routine I start with some really simple hangs, actually more a bit of playing around. Followed by some pull-ups, also in a playing-around type of fashion.
I’ve been climbing for about twenty years now and I have never had a really strict warm-up routine. This works for me and is also the reason I don’t have a strict warm-up on the hangboard. But it is important to listen to your body and to understand the signs your body is telling you. Also, if you are normally a bit of a slow starter don’t rush things. Hanging at your max, in particular, is pretty heavy on tendons and pulleys.
I don’t use a really strict warm-up routine, but I do force myself to perform a strict ‘warming through’ routine to protect myself from injuries. I know myself and I usually take too little rather than too much time to warm-up. I do my warm-through routine on the small edges of the hangboard using two hands. You can use any edge that feels comfortable to you, remember we are still in the warming-up phase! I use an app for the hanging routines and I highly recommend Seconds Pro (but there are many more apps). It makes it so much easier, you just press start and don’t have to keep track of the time anymore.
My routine is pretty simple: I hang for 10 seconds in a single grip position and then I rest for 50 seconds. I do every grip position twice before moving to the next one, in total this takes about 15 minutes. I am usually pretty warm by now. But as I already mentioned, I am not very good at warming up. So feel free to repeat the warming-through routine after some rest if you are not feeling properly warmed-up.
| 4 open, 10 sec | Rest, 50 sec | 4 open, 10 sec | Rest, 50 sec |
| 3 open, 10 sec | Rest, 50 sec | 3 open, 10 sec | Rest, 50 sec |
| Sloper, 10 sec | Rest, 50 sec | Sloper, 10 sec | Rest, 50 sec |
| 4 semi-crimp, 10 sec | Rest, 50 sec | 4 semi-crimp, 10 sec | Rest, 50 sec |
| 3 semi-crimp, 10 sec | Rest, 50 sec | 3 semi-crimp, 10 sec | Rest, 50 sec |
| Back 3, 10 sec | Rest, 50 sec | Back 3, 10 sec | Rest, 50 sec |
| Wide pinch, 10 sec | Rest, 50 sec | Wide pinch, 10 sec | Rest, 50 sec |
| Small pinch, 10 sec | Rest, 50 sec | Small pinch, 10 sec |
Maximum hanging
Now we can start with the real training. For me, it is way too easy to hang with two hands without added weight. So there are two options: add weight, or release one hand.
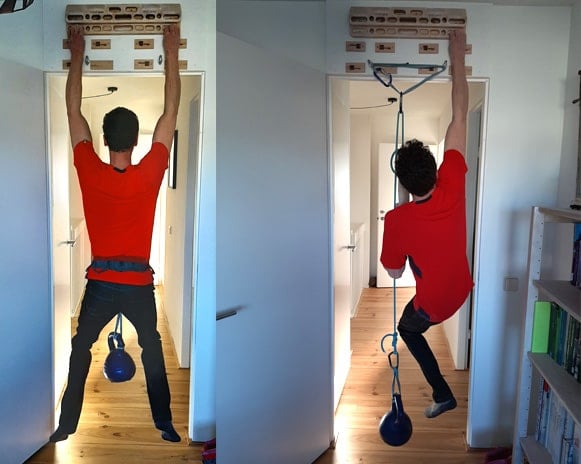
I like to do the max hanging single-handed because I really dislike adding much weight, it is such a hassle to move around with all those extra kilos. I am not strong enough to hang for 10 seconds single-handed, partly because I start to rotate, so to make it a bit easier and to avoid the rotation I use a pulley system so I can get some kilos off my hanging hand.
The routine I do is (again) pretty simple and it involves a lot of rest time. I originally started doing 1 min rests between arms (so if you hang double handed it is a 2 min rest), but I noticed it wasn’t enough. Lately I have been using 1 and a half min rests between arms (3 min if you do it double handed) and that feels a lot better. The hangtime I am aiming for is 10 seconds, I don’t know why but 10 sec just feels right to me. Notice that I am writing ‘aiming for’, because this is a crucial part for me.
"Trying really, really hard is key to improving..."
Writing down numbers and grip positions can become a bit alienated from the real experience. The way I approach climbing has always been key to my training and progress; try really hard, and then try a bit harder and maybe even a bit harder than that. I truly believe that this attitude has been a key factor in my success in climbing, and I also try to use it in my hangboarding. The result of this is that I challenge myself again and again, to find the limit of what I can do and also to push this limit.
So I aim for this 10 seconds hang, but I don’t want it to be easy. Completing the 10 seconds with a grimace, giving everything I have, is a win. Even if I fail at 10 seconds and complete 6 seconds instead, it still feels like a win. It is all about the experience, about the feeling and about completing those 10 seconds.
Trying really, really hard is key to improving. I do think it is important to also put a warning here: this is how I work and I know my body pretty well by now. Please always listen to the signs your body is giving you, know when to push harder and when not to. The last thing we all want is to get injured, it’s a fine line between pushing yourself as hard as you can and not getting injured.
Below is what I do. For one routine I choose two different grip types (as described above) and I use both types two times. For me this means two times for left and two times for right as I do one handed hangs.
| Grip type A left 10 sec | Rest 1,5 min | Grip type A right 10 sec | Rest 1,5 min |
| Grip type A left 10 sec | Rest 1,5 min | Grip type A right 10 sec | Rest 1,5 min |
| Grip type B left 10 sec | Rest 1,5 min | Grip type B right 10 sec | Rest 1,5 min |
| Grip type B left 10 sec | Rest 1,5 min | Grip type B right 10 sec |
After this I take a longer rest and repeat it with the same or with different grip types. I do between three and five of these routines. Depending on how much time I have and how I feel, it’s the same with a training session in the gym; sometimes you feel really strong and you train a bit longer and sometimes the opposite. The only question left is what grip types to use, and that is pretty personal. I would recommend working on your weaknesses, but never forget your strong points and to vary a lot. I also think that the semi-crimp positions are good to train as they really engage the muscles in the underarm.
The thing with hangboarding is that the waiting time is far longer than the hanging time, so it can be a bit boring. Try to find something that keeps you motivated: music, Netflix or a climbing movie on YouTube. A few days ago I put on a Mike Tyson documentary that motivated me so much that I had the longest and maybe best hang session ever.
Let’s all hope the Corona crisis goes away as quickly as possible and I hope this hangboarding article helps a bit with the home quarantine. Good luck!

